2020년 9월 27일 일요일

[python]DataFrame, pandas string DateTime으로 변환

 #그래프 그리기 테스트

code034020_df['y']=code034020_df['y'].astype(int)

code034020_df['ds'] = code034020_df['ds'].astype(str)


# 현재 형태가 202009180900
#이런식이니까 format을 '%Y%m%d%H%M' 이렇게 맞춰줘야한다.

code034020_df['ds'] = pd.to_datetime(code034020_df['ds'],format='%Y%m%d%H%M',errors='raise')

code034020_df.plot(x'ds',y='y')

# plt.plot(code034020_df)

# plt.show()

2020년 9월 26일 토요일

pandas indexing(txt 내린파일 변환)

import pandas as pd
from fbprophet import Prophet

path = './PycharmProjects/Stock_Test2/2020-09-18_dummy.log'
stock_dic = {}
stock_list =[]

f = open(path,'r',encoding='cp949')
lines = f.readlines()

for line in lines:
    ls = line.split(',')
    if len(ls) < 2:
        continue

    stock_code = ls[0][15:]
    stock_cheGyuelTime = "20200918"+ls[1][6:]
    stock_currentPrice = ls[2][5:]
    stock_updown_percent = ls[4][5:]
    stock_useon_mesu = ls[6][11:]
    stock_guraeryang = ls[7][5:]
    
    stock_dic.update({stock_code:{"종목코드":stock_code,
                                  "채결시간":stock_cheGyuelTime,
                                  "현재가":stock_currentPrice,
                                  "등락율":stock_updown_percent,
                                  "거래량":stock_guraeryang}
                     })
    
    stock_list.append([stock_code,stock_cheGyuelTime,stock_currentPrice,stock_updown_percent,stock_guraeryang])
    
f.close()

my_df = pd.DataFrame(stock_list,columns=['종목코드','채결시간','현재가','등락율','거래량'])
#print(my_df)
my_df.head()
#my_df.tail()


new_df =my_df.loc[:,['종목코드','채결시간']]
new_df =my_df.loc[:,['채결시간','현재가']]
new_df

code034020_df =  my_df.loc[my_df['종목코드'] == '034020']
code034020_df = code1_df.loc[:,['채결시간','현재가','종목코드']]
code034020_df


2020년 9월 20일 일요일

[파이썬]python DataFrame 만드는 방법


From list of lists, array of arrays, list of series

2차원 리스트나 2차원 numpy array로 DataFrame을 만들 수 있습니다. 심지어 pandas Series를 담고 있는 리스트로도 DataFrame을 만들 수 있습니다.

따로 column과 row(index)에 대한 설정이 없으면 그냥 0, 1, 2, ... 순서로 값이 매겨집니다.

import numpy as np
import pandas as pd

two_dimensional_list = [['dongwook', 50, 86], ['sineui', 89, 31], ['ikjoong', 68, 91], ['yoonsoo', 88, 75]]
two_dimensional_array = np.array(two_dimensional_list)
list_of_series = [
    pd.Series(['dongwook', 50, 86]), 
    pd.Series(['sineui', 89, 31]), 
    pd.Series(['ikjoong', 68, 91]), 
    pd.Series(['yoonsoo', 88, 75])
]

# 아래 셋은 모두 동일합니다
df1 = pd.DataFrame(two_dimensional_list)
df2 = pd.DataFrame(two_dimensional_array)
df3 = pd.DataFrame(list_of_series)

print(df1)
          0   1   2
0  dongwook  50  86
1    sineui  89  31
2   ikjoong  68  91
3   yoonsoo  88  75

From dict of lists, dict of arrays, dict of series

파이썬 사전(dictionary)으로도 DataFrame을 만들 수 있습니다.

사전의 key로는 column 이름을 쓰고, 그 column에 해당하는 리스트, numpy array, 혹은 pandas Series를 사전의 value로 넣어주면 됩니다.

import numpy as np
import pandas as pd

names = ['dongwook', 'sineui', 'ikjoong', 'yoonsoo']
english_scores = [50, 89, 68, 88]
math_scores = [86, 31, 91, 75]

dict1 = {
    'name': names, 
    'english_score': english_scores, 
    'math_score': math_scores
}

dict2 = {
    'name': np.array(names), 
    'english_score': np.array(english_scores), 
    'math_score': np.array(math_scores)
}

dict3 = {
    'name': pd.Series(names), 
    'english_score': pd.Series(english_scores), 
    'math_score': pd.Series(math_scores)
}


# 아래 셋은 모두 동일합니다
df1 = pd.DataFrame(dict1)
df2 = pd.DataFrame(dict2)
df3 = pd.DataFrame(dict3)

print(df1)
       name  english_score  math_score
0  dongwook             50          86
1    sineui             89          31
2   ikjoong             68          91
3   yoonsoo             88          75

From list of dicts

리스트가 담긴 사전이 아니라, 사전이 담긴 리스트로도 DataFrame을 만들 수 있습니다.

import numpy as np
import pandas as pd

my_list = [
    {'name': 'dongwook', 'english_score': 50, 'math_score': 86},
    {'name': 'sineui', 'english_score': 89, 'math_score': 31},
    {'name': 'ikjoong', 'english_score': 68, 'math_score': 91},
    {'name': 'yoonsoo', 'english_score': 88, 'math_score': 75}
]

df = pd.DataFrame(my_list)
print(df)
   english_score  math_score      name
0             50          86  dongwook
1             89          31    sineui
2             68          91   ikjoong
3             88          75   yoonsoo
관련 질문


2020년 9월 12일 토요일

[python] 파이썬 빈 DataFrame에 데이터 넣기


그냥 Append 한다고끝이아니라

이렇게 직접 넣어줘야한다

self.sell_list = self.sell_list.append(pd.DataFrame([['22','151','sadsad']],columns=['date','sell_price','reason']))


예제

print("before sell_list %s" %self.sell_list)
self.sell_list = self.sell_list.append(pd.DataFrame([['22','151','sadsad']],columns=['date','sell_price','reason']))
print("after sell_list %s" % self.sell_list)
# self.sell_list = pd.DataFrame(['22','151','sadsad'],index=['date','sell_price','reason'])
# self.sell_list.append(pd.Series)

# self.sell_list.append(pd.DataFrame(['22','151','sadsad'],index=['date','sell_price','reason']))

print("0번째 인덱스 값 %s "%self.sell_list.iloc[0])

2020년 9월 11일 금요일

[gitlab] 깃랩 _ 로컬저장소의 파일 새 프로젝트로 올리기

 로컬저장소의 파일 새 프로젝트로 올리기

1. 프로젝트가 있는 디렉터리로 이동하기

2. 초기설정

//아이디 닉네임 설정
$ git config --global user.name "gitlab닉네임"

$ git config --global user.email "gitlab이메일"

3. init하기 

$ git init

4. remote 생성

ejdrma@gmail.com

https://gitlab.com/dooo3/(새로만들이름)

git remote add origin https://gitlab.com/userName/(만들고싶은 프로젝트 이름)


https:// 부분은 gitlab에서 HTTP를 복사하여 넣어줍니다

origin이란 이름의 remote를 생성합니다


5. 현재 디렉터리 add, commit

//현재 디렉터리 모두 내용 모두 add하기
$ git add .
//commit 

$ git commit - "init"


6. push

$ git push -u origin master

-u 옵션으로 origin master 로 push


https://beomseok95.tistory.com/132

해당 링크에 있는 게시물을 참조하였습니다

2020년 9월 7일 월요일

[유니티] orthographic 카메라 줌 인/아웃,이동(영역설정), 단면효과 잘림효과 ,unity orthographic Camera section Script


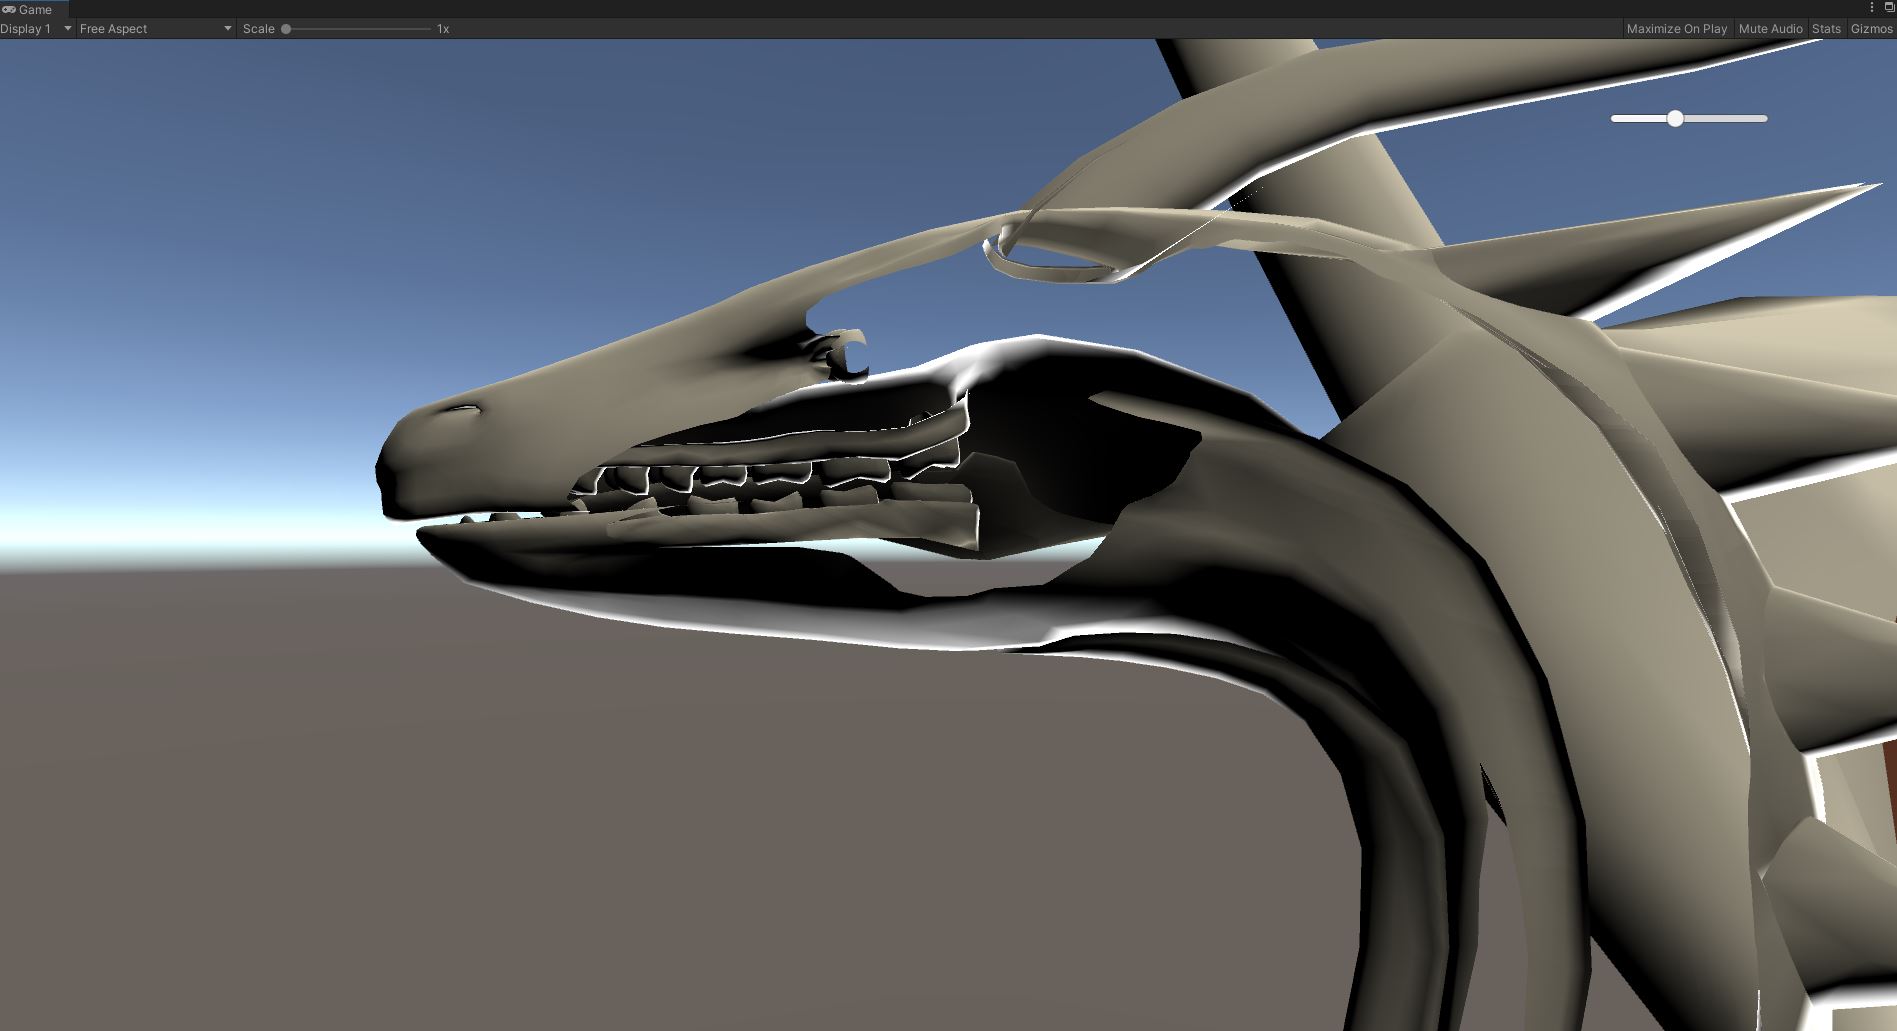
orthographic 카메라의 nearClipPlane 값을 조절하면 단면효과를 낼 수 있다.


예)


이런식으로 효과 가능


스크립트 :

using System.Collections;
using System.Collections.Generic;
using UnityEngine;
using UnityEngine.UI;
using UnityEngine.EventSystems;

public class Lv3_Cam : MonoBehaviour
{
    
    public Slider m_slider//nearClipPlane값을 조절하여 단면표현을 구현한다.
    public Transform Target//단면을 볼 타켓 오브젝트
    Camera mainCam;
    float rotX;
    public float sensitivityX;
    public float sensitivityY;


    public Vector3 CamCenter;

    [Header("카메라 영역 설정")]
    float minX;
    float minY;
    float maxX;
    float maxY;


    float vertExtent;
    float horzExtent;
    // Start is called before the first frame update
    void Start()
    {
        mainCam = Camera.main;
        m_slider.onValueChanged.AddListener(delegate { Zoom_TP(m_slider.value); });


        SetBound();

    }


    public void SetBound()
    {
        float vertExtent = mainCam.orthographicSize;
        float horzExtent = vertExtent * Screen.width / Screen.height;

        float verticalHeightSeen = Camera.main.orthographicSize * 2.0f;

        // Calculations assume map is position at the origin
        minX = horzExtent - (verticalHeightSeen * Camera.main.aspect);
        maxX = (verticalHeightSeen * Camera.main.aspect) - horzExtent;
        minY = vertExtent - verticalHeightSeen;
        maxY = verticalHeightSeen - vertExtent;


    }
    public float RotationSpeed = 5;

    public void Zoom_TP(float value)
    {
        mainCam.nearClipPlane = value;
    }

    // Update is called once per frame
    void Update()
    {
        ///UI 눌럿을때는 이동기능 하지 않게
        if (isPointerOverUIObject(Input.mousePosition))
            return;


        #region 타겟 오브젝트 이동기능
        if (Input.GetMouseButton(2))
        {
            rotX = Input.GetAxis("Mouse X") * RotationSpeed * Mathf.Deg2Rad * mainCam.orthographicSize;
            Target.RotateAround(Vector3.up, -rotX);
        }

        if (Input.GetAxis("Mouse ScrollWheel") != 0)
        {
            mainCam.orthographicSize -= Input.GetAxis("Mouse ScrollWheel");
            
            Setcenter();
        }

        ///움직일수 있는 영역을 설정(정확하지는 않음)
        if (Input.GetMouseButton(0))
        {
            float verticalHeightSeen = Camera.main.orthographicSize * 2.0f;

            if (mainCam.transform.position.x < minX)
            {
                mainCam.transform.position = new Vector3(minXmainCam.transform.position.ymainCam.transform.position.z);
                return;
            }
            if (mainCam.transform.position.x > maxX)
            {
                mainCam.transform.position = new Vector3(maxXmainCam.transform.position.ymainCam.transform.position.z);
                return;
            }

            if (mainCam.transform.position.y < minY)
            {
                mainCam.transform.position = new Vector3(mainCam.transform.position.xminYmainCam.transform.position.z);
                return;
            }
            if (mainCam.transform.position.y > maxY)
            {
                mainCam.transform.position = new Vector3(mainCam.transform.position.xmaxYmainCam.transform.position.z);
                return;
            }

            //if (mainCam.transform.position.x > minX)
            //    mainCam.transform.position = new Vector3(minX, mainCam.transform.position.y, mainCam.transform.position.z);


            mainCam.transform.position -= mainCam.transform.right * Input.GetAxis("Mouse X") * sensitivityX * mainCam.orthographicSize;
            mainCam.transform.position -= mainCam.transform.up * Input.GetAxis("Mouse Y") * sensitivityY * mainCam.orthographicSize;
        }
        #endregion
     

    }

    /// <summary>
    /// 줌인을 할때마다 영역의 크기가 달라지므로 센터값을 변경해준다.
    /// </summary>
    void Setcenter()
    {
        CamCenter = mainCam.transform.position;
    }


    //Mouse가 UI 위에 있는지 확인하기위한 함수
    public bool isPointerOverUIObject(Vector2 touchPos)
    {
        PointerEventData eventDataCurrentPosition
            = new PointerEventData(EventSystem.current);

        eventDataCurrentPosition.position = touchPos;

        List<RaycastResultresults = new List<RaycastResult>();

        EventSystem.current.RaycastAll(eventDataCurrentPositionresults);

        return results.Count > 0;
    }

    //void OnDrawGizmos()
    //{
    //    float verticalHeightSeen = Camera.main.orthographicSize * 2.0f;

    //    Gizmos.color = Color.cyan;
    //    Debug.Log("xSize: " + (verticalHeightSeen * Camera.main.aspect));
    //    Debug.Log("ySize: " + (verticalHeightSeen));
    //    Gizmos.DrawWireCube(transform.position, new Vector3((verticalHeightSeen * Camera.main.aspect), verticalHeightSeen, 0));
    //}
}


git rejected error(feat. cherry-pick)

 문제 아무 생각 없이 pull을 받지않고 로컬에서 작업! 커밋, 푸시 진행을 해버렷다. push에선 remote와 다르니 당연히 pull을 진행해라고 하지만 로컬에서 작업한 내용을 백업하지 않고 진행하기에는 부담스럽다(로컬작업 유실 가능성) 해결하려...